What is PI planning?
PI Planning stands for Program Increment Planning. Teams using the Scaled Agile Framework® (SAFe®) schedule these two-day events every eight to 12 weeks depending on the length of their increments. These planning sessions or ceremonies give big teams a chance to coordinate and integrate the actions of smaller team units.
Project managers figure out the planned features for the increment, development teams own user story planning, and UX designers and researchers validate the planning. The goal here is to align teams both to the mission of the organization and to each other.
If you’re new to using the SAFe framework, you’ll want to begin with the PI Planning ceremony.
Why is PI planning important?
PI planning is essential for large scale organizations using Agile. Imagine an organization with a few thousand developers. These developers might be broken down into smaller 400 to 600-person teams. Before PI planning, it was not uncommon for teams like this never to talk to each other (unless something went drastically wrong), leading to severe organizational silos.
In the past, any alignment on vision would have happened only from the top down. Managers of teams might have gotten together to talk about the big picture — vision, mission, values. And of course, we’re talking about multiple levels of management playing telephone, passing the information down to their teams. But the teams themselves would never coordinate.
So, PI planning is the first opportunity many teams at large organizations get to talk to one another. It’s exciting because as the Agile Manifesto states, “the most efficient and effective method of conveying information to and within a development team is a face-to-face conversation."
Benefits of PI planning
- Establishing communication across all team members and stakeholders
- Building a social network that makes the Agile Release Train (ART) really work
- Aligning development to business goals
- Identifying dependencies and cultivating cross-team and cross-ART collaboration
- Syncing up demand and capacity
- Eliminating excessive Work in Process (WIP)
- Fast decision-making
PI Planning and the Scaled Agile Framework (SAFe)
If you are just getting started with the Scaled Agile Framework (SAFe), you may be wondering how PI Planning fits into the picture.
Basically, SAFe is a set of guidelines and workflow patterns for implementing Agile at scale. And PI Planning gives you a simple framework to bring your agile teams together. You can think of it as the framework within the framework.
PI Planning is a vital part of SAFe. It’s a ceremony that brings together stakeholders from every team and gives them a plan for working together to decide on top features, identify dependencies, and make a plan for the next program increment. Ideally, PI Planning allows for greater visibility across teams, smoother changes, and more coordination at every level of the organization.
What stakeholders are involved in PI planning?
There are five critical roles involved in PI planning:
- Release train engineers (RTE)
- Product managers
- Product owners
- Scrum leaders (aka scrum masters)
- Developers
Let’s look at the responsibilities of each.
The release train engineer (RTE) is a leader and coach for the ART. Their role is about planning and facilitating the PI planning event.
The RTE:
- Establishes and communicates the annual calendar
- Gets everything ready, including for pre- and post-PI planning meetings
- Manages risks and dependencies
- Creates Program PI objectives from team PI objectives and shares them with all the stakeholders
- Tracks progress
- Ensures strategic and execution alignment
- Facilitates system demos
The RTE is also the facilitator of the two-day event. In this role, they present the planning process and expected outcomes. They also run the management and problem solving session, as well as the retrospective at the end.
The product manager presents the program vision and any upcoming milestones. They review the draft plan and explain any changes to the planning and scope based on the management and problem solving session. This allows the project manager to manage and prioritize the workflow. Once the PI planning event is over, managers use the program objectives to update the roadmap. Project managers are also involved in pre- and post-PI planning meetings.
The product owner is responsible for maintaining and prioritizing the team backlog as well as iteration planning. They also have content authority to make decisions at the user story level during PI planning team breakout sessions. Product owners help teams define stories, estimate and sequence workflows, as well as draft team PI objectives. Finally, they’re responsible for conveying the vision and goals from upper management to the team.
The scrum leader (aka scrum master) helps the product owner by managing and leading processes as well as being a liaison between the product owner and the development team. They facilitate preparation for events and help to prepare system demos. The scrum master also helps teams estimate their capacity and finalize their team PI objectives, as well as manage deadlines, dependencies, and ambiguities during team breakout sessions.
Developers research, design, implement, test, maintain, and manage software systems. During PI planning, they participate in breakout sessions to build and refine user stories and acceptance criteria. They also help with plan adjustments, identify risks and dependencies, and support the team in drafting team PI objectives.
Now that you understand all the pieces of the PI planning event and who’s involved, let’s see what you have to do to prepare your team before the event.
Before the planning session: how to prepare
Every PI planning event requires strong preparation to make sure your teams get the most out of the event and meet their objectives afterwards. So what does preparation look like?
All stakeholders must prepare by assigning key roles, ensuring they as a team are aligned on strategy, and making sure everyone understands the planning process. Presenters will need to do the most to prepare getting their content ready for prime time.
In addition, you’ll likely have hundreds of participants, so you’ll need to ensure the proper event planning happens. If your teams are meeting in person, you’ll need to prepare the facility. If you’re doing PI planning virtually, you’ll need to treat this like the virtual event that it is. Focus on technology (including audio, video, and internet connectivity) to make sure all remote teams can participate.
Also, to make this work seamlessly for your organization, you may need to customize PI planning templates that support your needs. Consider the comfort needs of your teams too. The best planning happens when everyone is well fed and hydrated.
Having a clear picture of what needs to be done before and during this event, let’s look at an example agenda and then turn to what happens afterward.
Example PI planning agenda
Every PI planning session follows the same general agenda, though it can be adapted depending on your teams' needs. For example, if you're doing PI planning digitally with a remote or hybrid team, you might consider spreading the event over five days instead of two to accommodate different timezones.
Here’s what a standard agenda might look like.
Day 1
- Business context (8–9 a.m.)
A leader or executive describes the current state of the business, shares their vision, and presents a perspective on how effectively current solutions are meeting customer needs. - Product/solution vision (9–10:30 a.m.)
The head of product presents the current vision (e.g., top 10 upcoming new features), highlights changes from the previous PI planning event, and introduces forthcoming milestones. - Architecture vision and development practices (10:30–11:30 a.m.)
The System Architect or Engineer presents the architecture vision. A senior development manager may also introduce Agile-supportive changes to development practices being advanced in the upcoming PI. - Planning context and lunch (11:30–1 p.m.)
The Release Train Engineer (RTE) presents the planning process and expected outcomes. - Team breakout sessions (1–4 p.m.)
Individual teams meet to estimate their capacity for each iteration and identify the backlog items they’ll need to realize the features. Each team creates draft plans visible to all stakeholders. - Draft plan review (4–5 p.m.)
Teams present key planning outputs, which include capacity, draft PI objectives, potential risks, and dependencies. Other teams and stakeholders review and provide input. - Management and problem solving (5–6 p.m.)
Management may negotiate scope changes and resolve any challenges by agreeing to varying planning adjustments.
Day 2
- Planning adjustments (8–9 a.m.)
Management begins day 2 by presenting any changes to scope, people, or resources. - Team breakouts (9–11 a.m.)
Teams continue planning based on the previous day’s agenda and make appropriate adjustments. They finalize their objectives and managers sign off. - Final plan review and lunch (11–1 p.m.)
Teams present their plans to the group. At the end of their time slot, teams state their risks and obstacles. The team then asks managers if it’s acceptable. If there are concerns, then teams have the opportunity to adjust the plan and present the revised plan. - Program risks (1–2 p.m.)
The risks identified by each team are resolved in front of the whole train. One by one, the risks are discussed and categorized. - Confidence vote (2–2:15 p.m.)
Once program risks have been identified and addressed, teams vote on their confidence in their ability to meet their team PI objectives. If the team is confident, then management should accept their commitment. Anyone who doesn't feel confident has the chance to voice their concerns. - Plan rework as needed (2:15–X:XX p.m.)
If necessary, teams rework their plans until they reach a high level of confidence. - Planning retrospective and moving forward (when ready)
Finally, the RTE leads a brief retrospective for the PI planning event to capture what went well and what can be done better next time.
Why is a confidence vote held at the end of PI planning?
Arguably the most important part of PI planning is the confidence vote. Here’s how it works: The RTE asks, “will we meet our objectives?” Then everyone in the room votes by raising a hand showing a number of fingers expressing their level of confidence (5 fingers = very confident, 1 finger = not confident). If the average is three fingers or higher, then the plan is good to go. If it’s less than three, the plan needs to be reworked. Anyone who votes with just one or two fingers, has the chance to voice their concerns.
After the PI planning session
Your PI retrospective will include discussing what went well and what could have gone better. Then there should be a discussion about next steps. Next steps will include plans for moving team plans and objectives forward, coordinating calendars, and setting daily standups and iteration meetings.
Also, there will be post-PI planning events, which bring together stakeholders across all Agile Release Trains within the solution train to ensure everything is synchronized. Post-PI planning happens after all teams have completed their planning for the next increment. Teams present plans, explain objectives, and share milestones and expected timelines.
Post-PI planning happens among teams and instead of looking at features, these ceremonies outline capabilities, dependencies, and milestones for each iteration and ART. Potential risks are identified, discussed, and owned, resolved, accepted, or mitigated. Similar to regular PI planning events, post- PI plans go through a vote of confidence.
Is it better to do PI planning in-person, hybrid, or remote?
Before the innovation of digital tools, like Mural, allowing remote teams to collaborate around the globe, PI Planning was done with everyone attending in person. Obviously, getting teams from around the world together in the same physical location for two days cost companies a great deal. Now more than ever, SAFe teams are discovering the power of tools that make it easy to do PI Planning remotely.

Imagine a team of about 300 PI planners (engineers, scrum masters, release train engineers, Agile coaches, leadership, etc.) from a large Fortune 500 company team. Every quarter, hundreds of international colleagues are flown to one location in the United States and grouped into about 25 teams. Each team has a scrum master and their own PI planning board. The scrum master leads the team to discuss the priorities for the quarter (or given timeframe), the effort required to achieve objectives and any dependencies between working groups, using their planning board as a visual.
That’s quite a large investment in travel, plus a lot of pressure for scrum masters and their participating PI planners to make the most out of the few days they have together. Is this really the best way to maximize results?
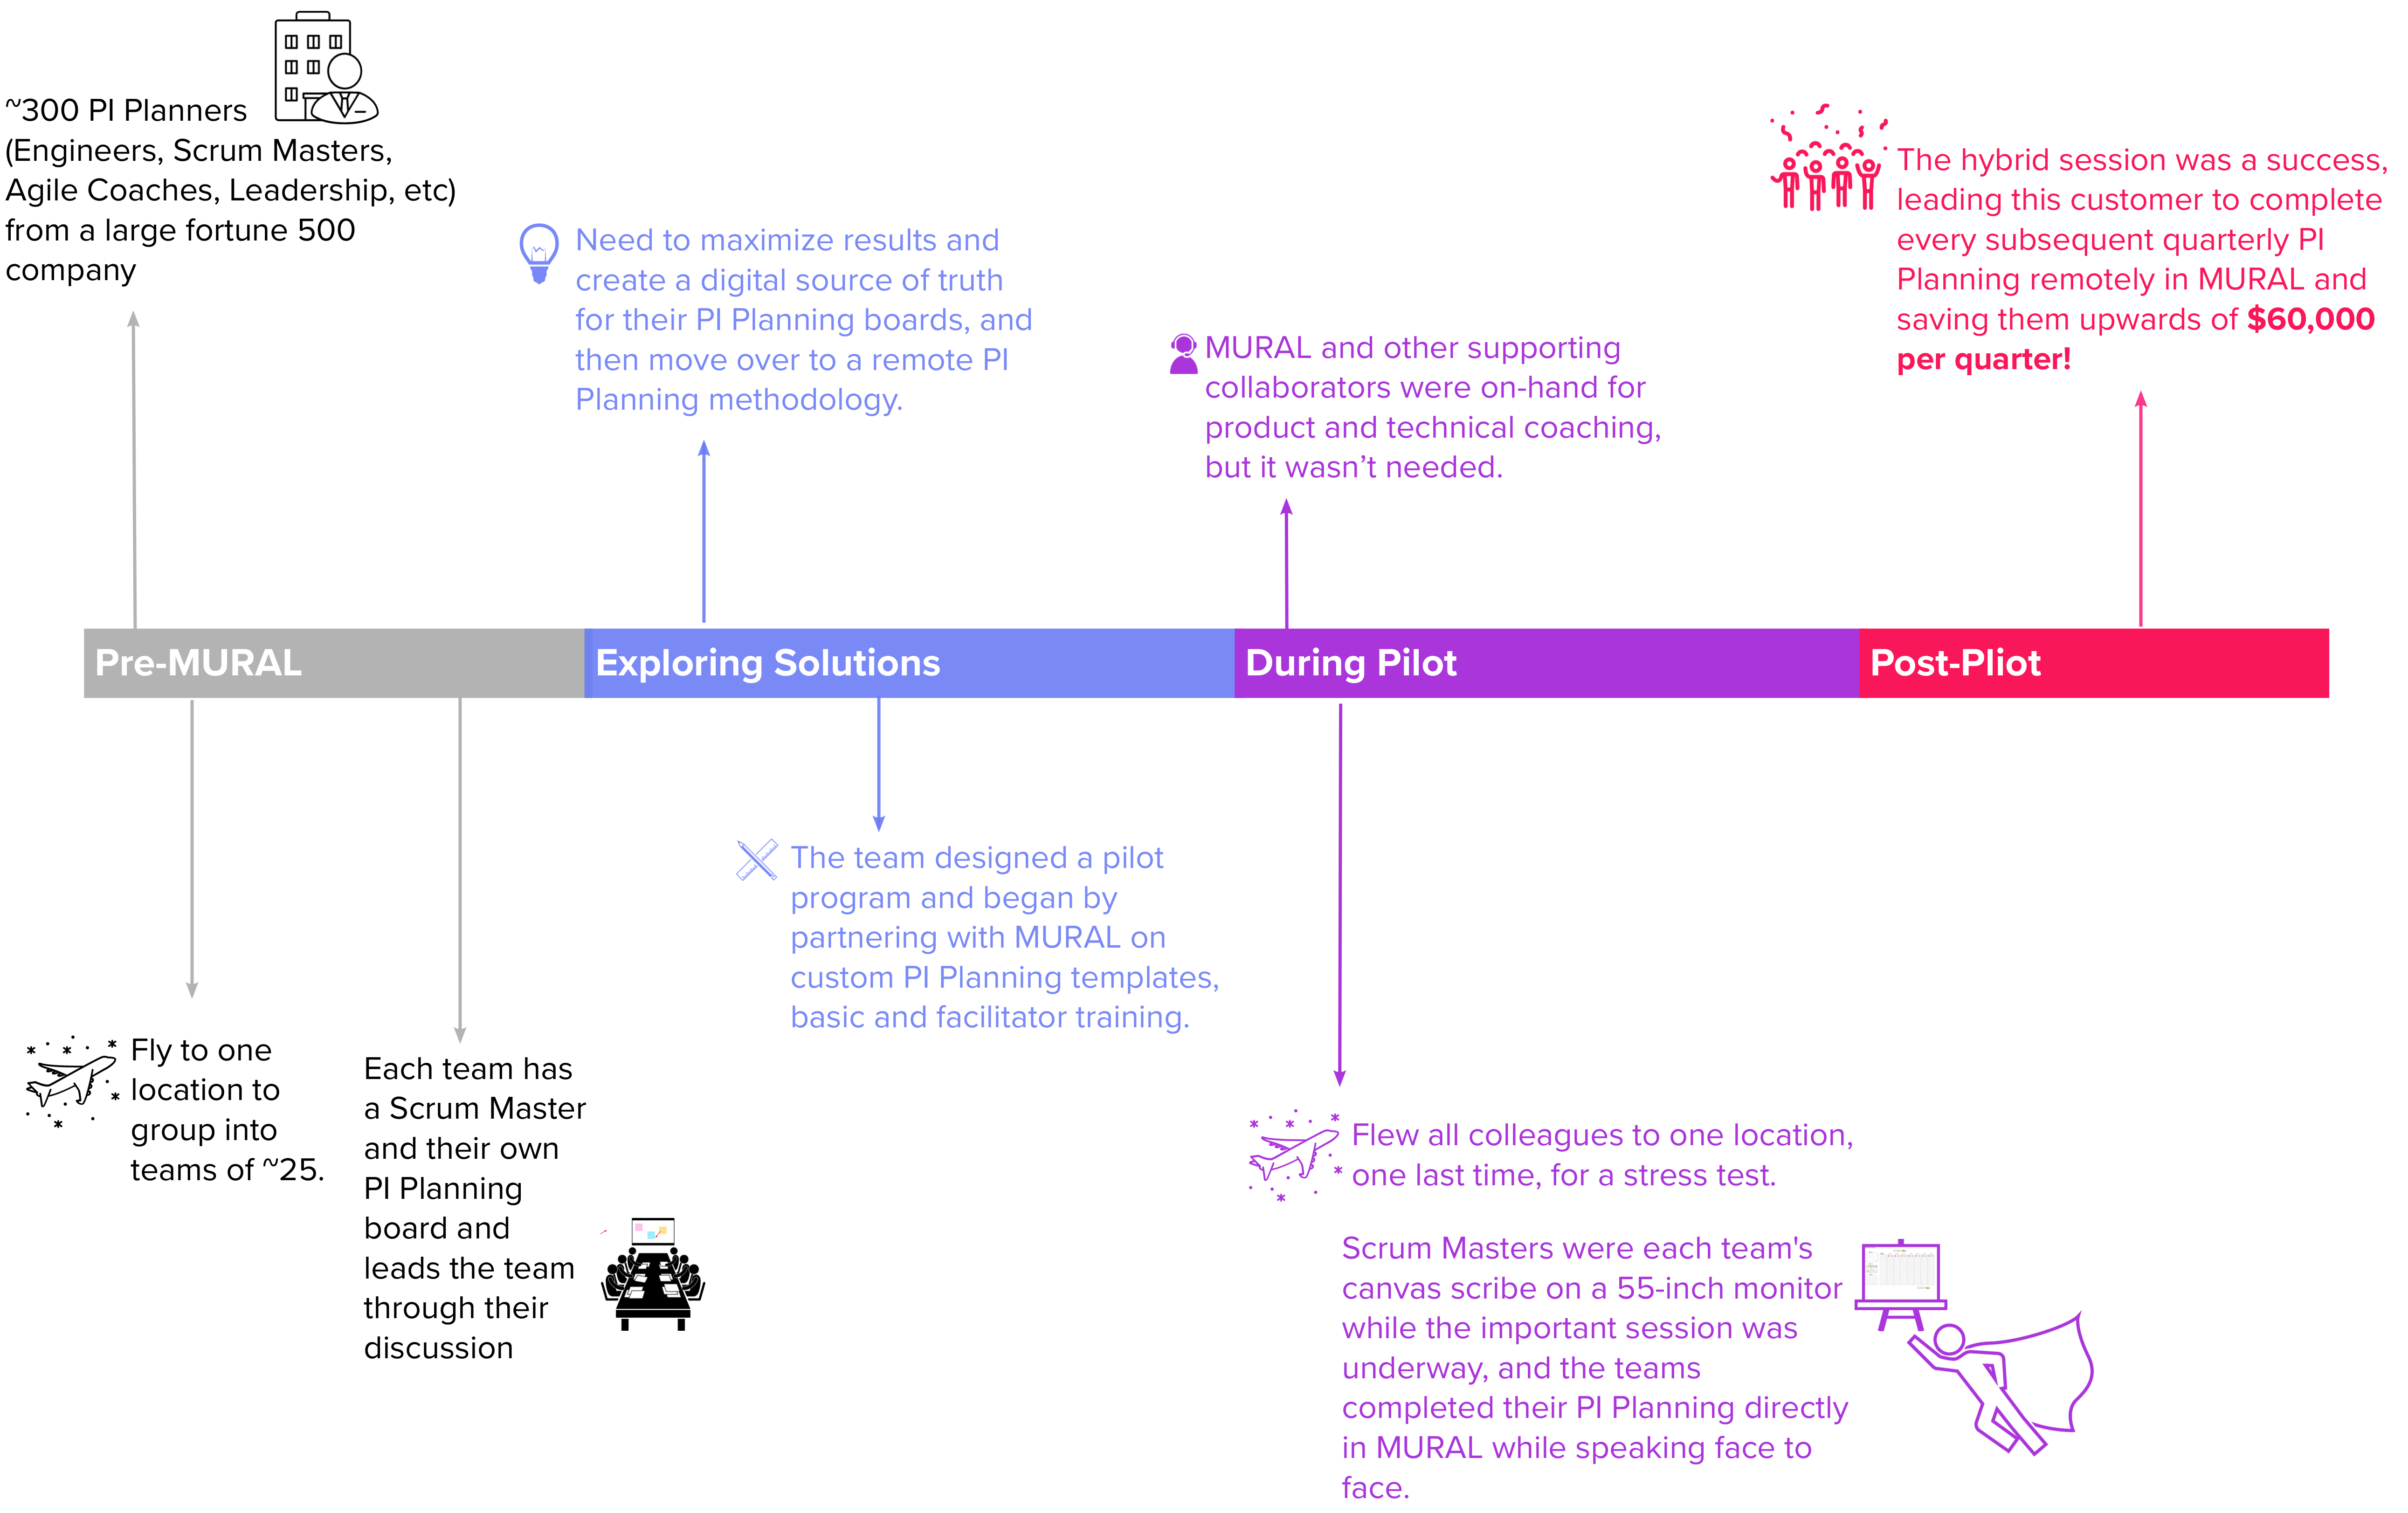
The team in this story realized no, it wasn’t the best way. They sought out MURAL's digital workspace to help them create a digital source of truth for their PI planning boards, and then moved over to a fully remote PI Planning methodology.
They designed a pilot program and partnered with MURAL on custom PI Planning templates and facilitator training. The team then flew all colleagues to one location, one last time, for a stress test.
Scrum masters were asked to be each team's canvas scribe on a 55-inch monitor while the important session was underway, and the teams completed their PI planning directly in Mural while speaking face to face. MURAL experts were on-hand for product and technical coaching, but it wasn’t needed. The transition was seamless and the hybrid session was a success, leading this customer to complete every subsequent quarterly PI planning remotely in MURAL, saving them upwards of $60,000 per quarter.
There are many other teams like this one paving their way to 21st century Agile work using MURAL. Read on for more of our tips and learnings.👇
How to perform PI planning in Mural
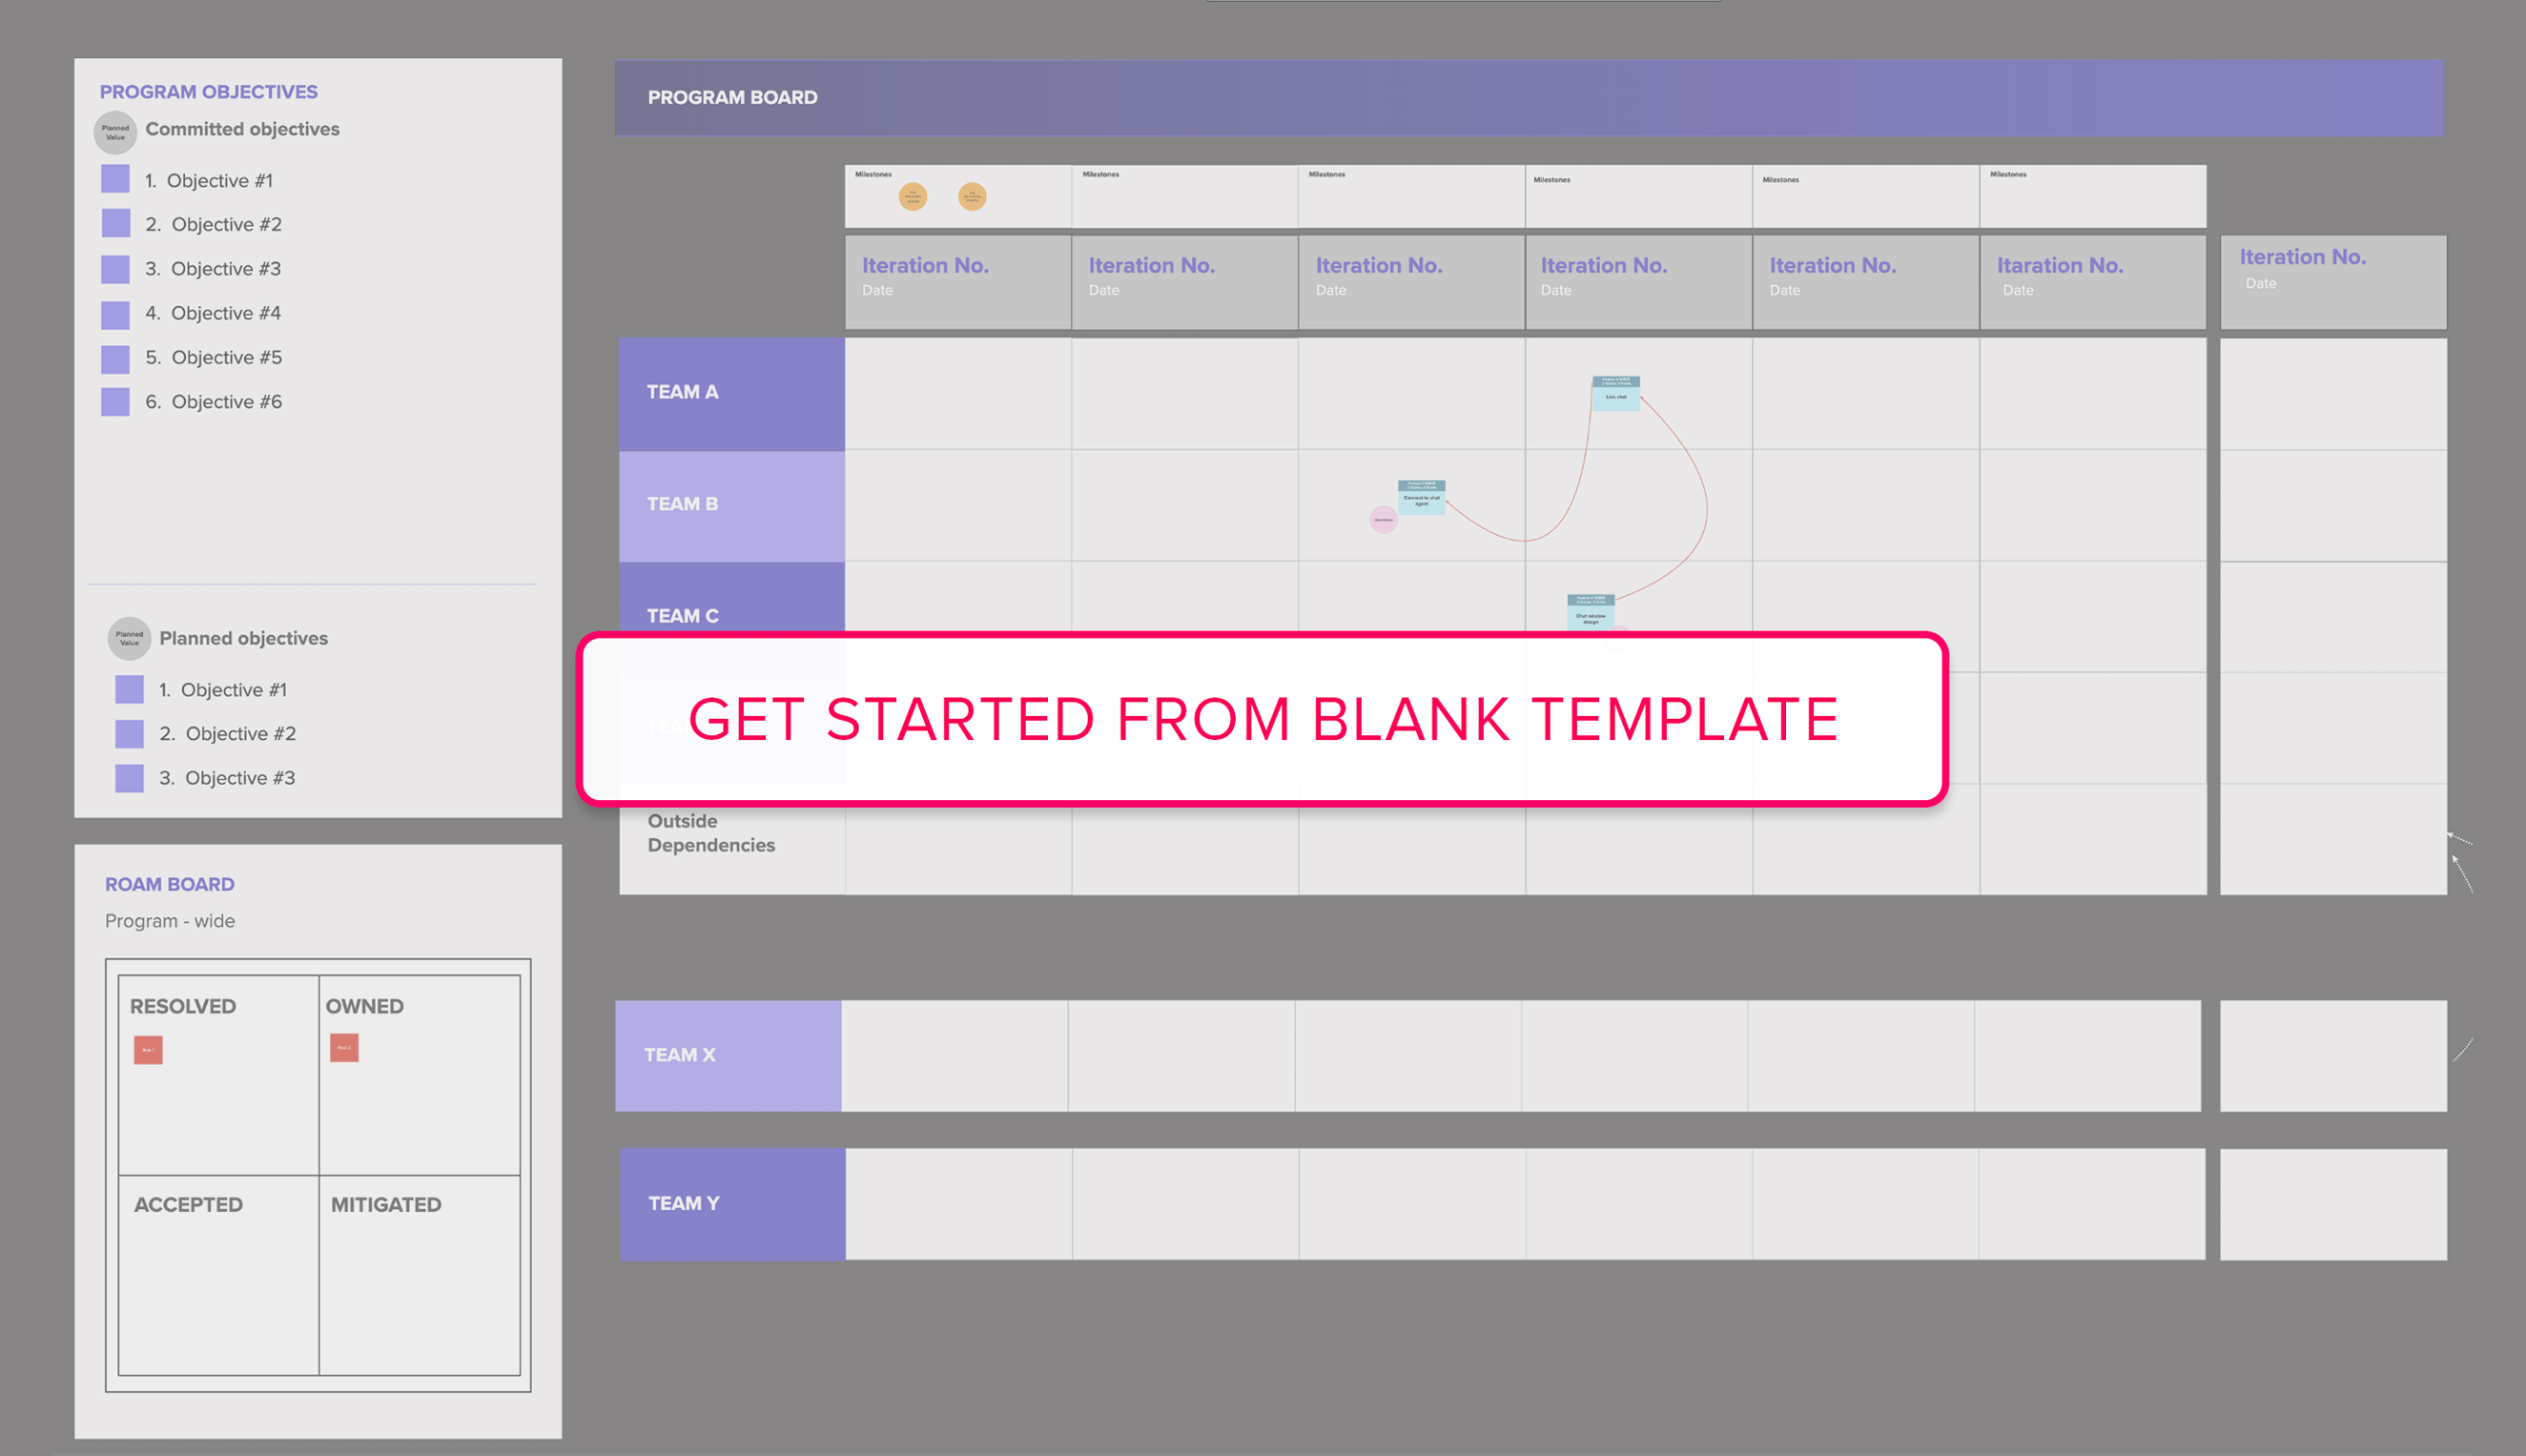
PI Planning Program Board
Create a visual summary of the goals, features, risks, dependencies, and timelines defined in the program increment plan.
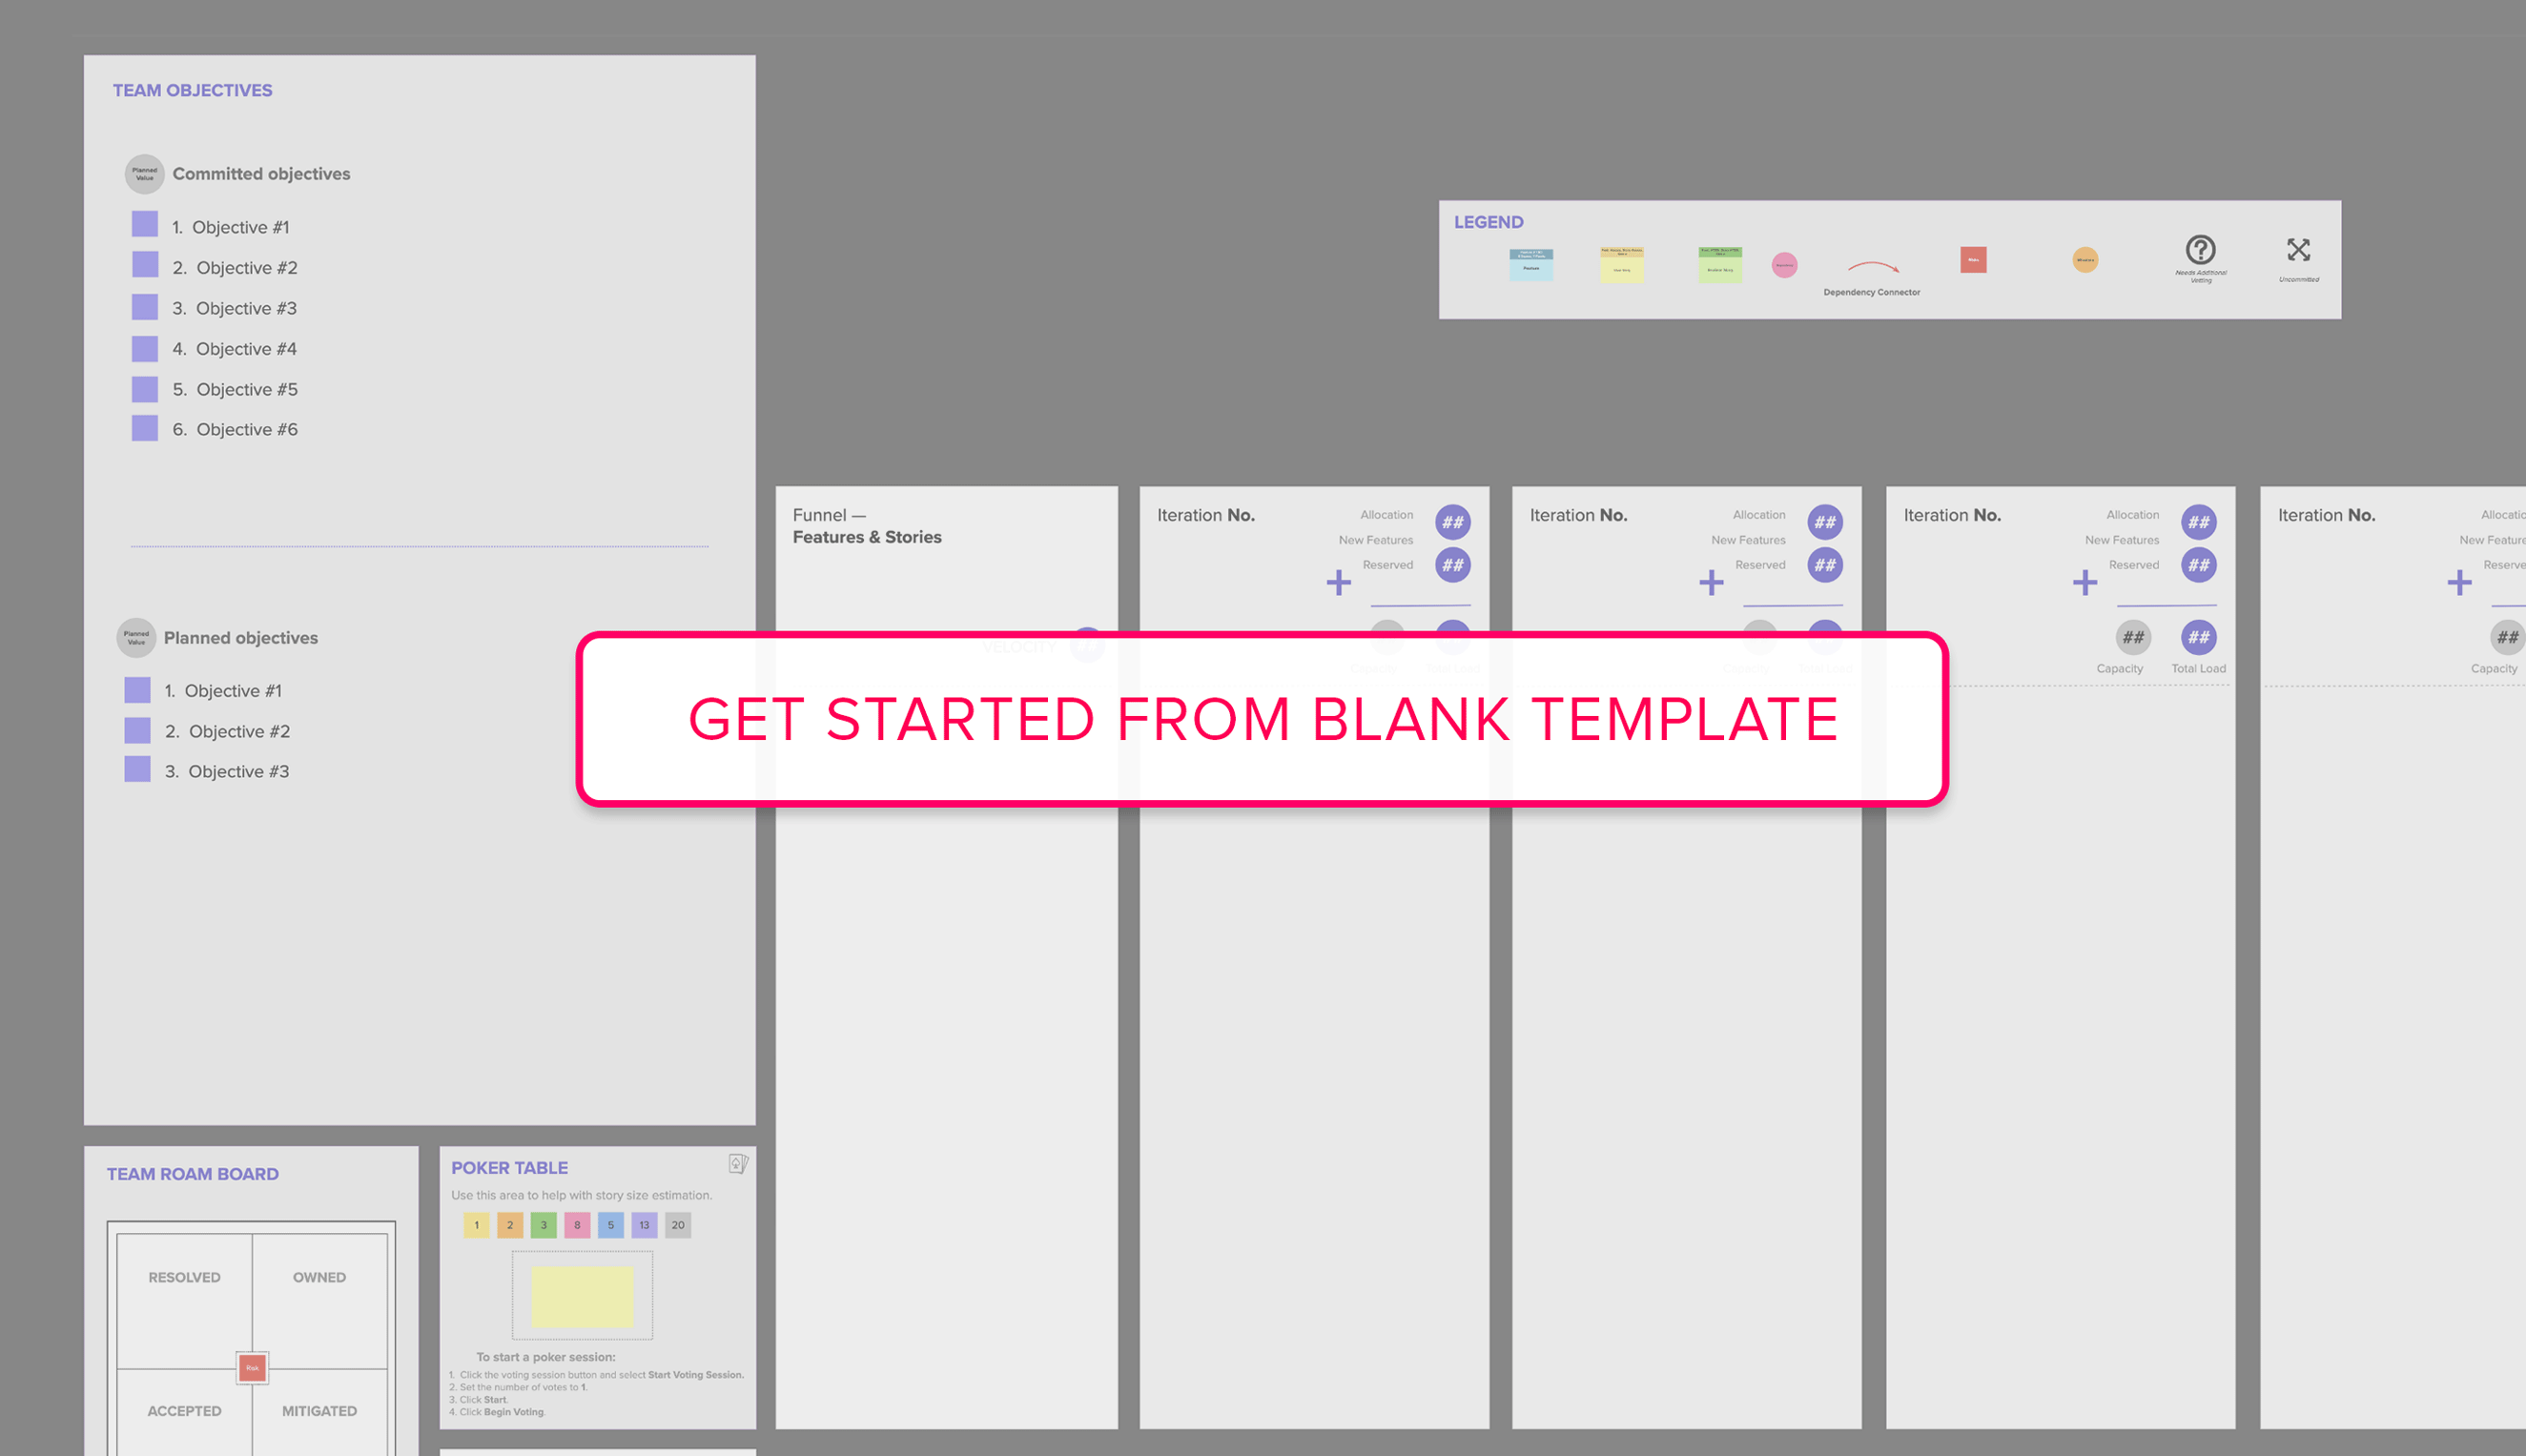
PI Planning Team Board
Estimate the capacity of each team to accomplish the tasks in each iteration. You'll need one per team who participate in the planning.
Paste from (and to) spreadsheets
Turn planning into trackable Jira tickets
How to get Jira content into Mural
Use the PI Planning Templates above for this exercise, or create your own. To get Jira content into MURAL, each cell from a Jira export can be copied to a canvas as an individual sticky.
Getting started
Copy all cells that include feature or story descriptions. Return to your MURAL canvas, and use Cmd (or Ctrl)+V to paste them. They will render as 3x3 stickies. Note that if you are pasting 150+ characters of text, cells will render as text boxes instead of stickies.
Matching legend formatting
Multi select all of these new stickies. Using the 'Switch Type' option in your formatting toolbar (second to last icon), convert the stickies to 3x5. From the formatting toolbar you may also change the sticky note color.
Adding feature #, story #, and size
Using the Alt key+clicking and dragging, duplicate the appropriate sticky note header from the Legend. (You may also use Cmd+D, or simple Copy/Paste.) Group the text box to the existing sticky note using Cmd (or Ctrl)+G, and include as much existing information as you can. Decrease the font size as needed to keep the header one line.
To get MURAL stickies into Jira, each sticky or text box from a Mural canvas can be copied to a spreadsheet as a cell. Before you start, determine what upload spreadsheet format you will need to use with Jira.
Copying stickies
Multi-select a group of sticky notes. Right click on them, & select 'copy as text'.
Completing your final data sort
Return to your spreadsheet. Use cmd (or ctrl) + V to paste your stickies. Click and drag each respective cell (description and it's header), dragging it to its appropriate position in the upload spreadsheet.
Separating feature #, story #, and size into separate cells
Select the column of data that includes sticky note header content (ex. "Feat. #34891 , Story #, Size 5"). Click your spreadsheet program's data menu. Select "Split Text to Columns", and use comma as the delimiter. This will result in 3 cells, "Feat. #34891" "Story #" "Size 5".

![How to run efficient Agile meetings [+ templates]](https://cdn.prod.website-files.com/63062129119620a44791a2eb/6646665988ca49da48322c20_Blog_Run%20Efficient%20Agile%20Meetings_SebCuri.avif)
.avif)